Thursday, March 31, 2011

This one is a headache.

I decided that I really must knuckle down and get the last three Baltimore blocks done. I think I must be right out of the groove after leaving them for so long. This Cornucopia is giving me attitude. I blame the fruit and the fruit is to blame for the fabric tornado in the sewing room.

I decided to draw on the background to place my pieces but because of the layering, I've reverted back to using a vinyl overlay as well. The more small pieces that get sewn on the block, the more distortion there is so using both has been a good idea for placement.

It's still a work in progress, I've done a bit of switching around with a few leaf colours and the fruit is going to get a makeover too. The orange could turn into another apple.
I had to refer back to the fruit in this block to look at my colours and fabrics, I'm so out of practice!

Monday, March 28, 2011

The latest blocks

I'm slowing down but I did get another five blocks done for the flower garden quilt.
I'll call this one my monkey flower.
I love how the black and orange one turned out. I figured there would be some darker fabrics in the borders so wanted to get some in the middle section of the quilt.
Lets not forget the pretty pastel blooms. The backgrounds are all the same fabric, it's just photography in different lights that make them look different.
Since my design wall is being occupied at the moment. I had this idea to put them all together in a photo collage to see how mixed and balanced the colours are. Do you think I need a bit more red or maybe something else?

Saturday, March 26, 2011

Trapunto by hand

I'm aware of two main methods of adding trapunto to hand quilting. Since most of my quilt is already quilted, I've been left with just one option which I'll try to explaining here step by step. This is my first try at it and I'm no expert but I found it relatively easy to do. All the photos can be clicked on for enlargement.
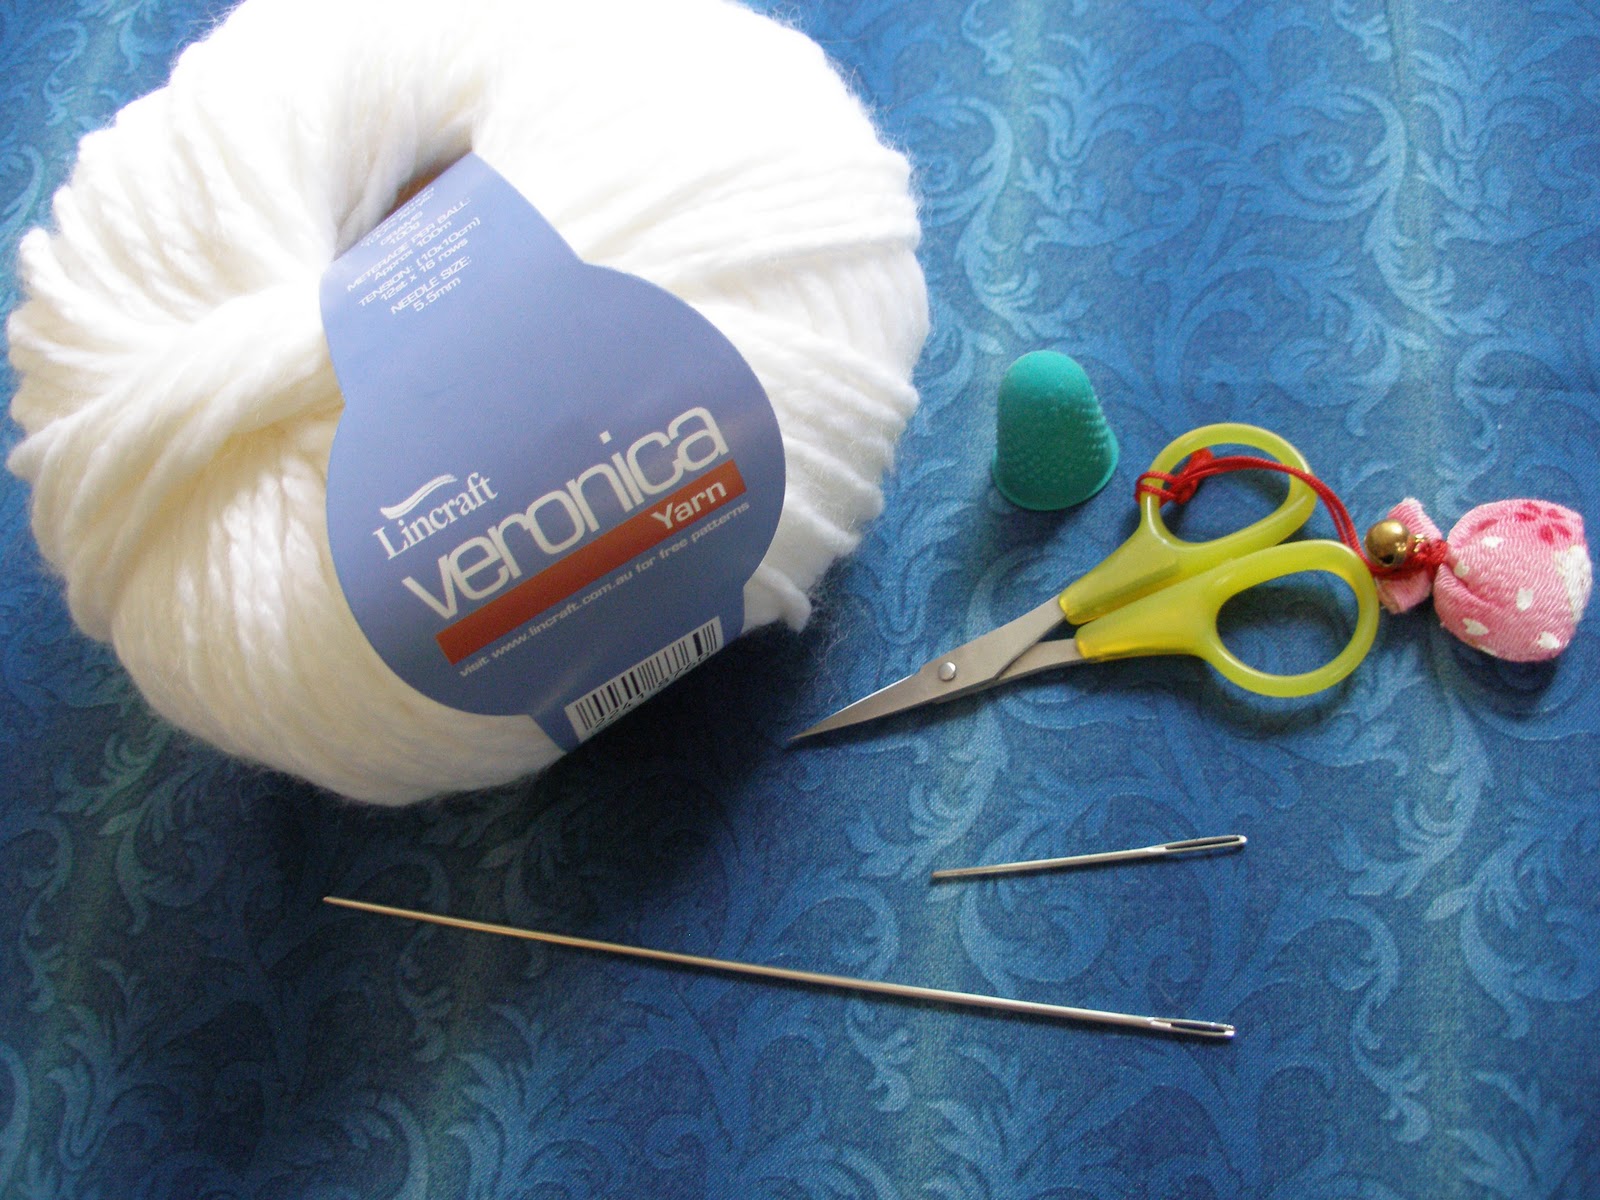
  • I'm using an acrylic bulky yarn that is very soft and doesn't have a tightly twisted ply. You can use wool but it must be washable and preshrunk. Matilda's Own had one for trapunto that they discontinued several months ago.
  • A six inch trapunto needle. I do know that Clover, Bohin, John James and Birch all make them.
  • A shorter tapestry needle can be helpful for small shapes.
  • Small sharp pair of scissors.
  • Rubber finger to help pull the needle through.
  • A toothpick.
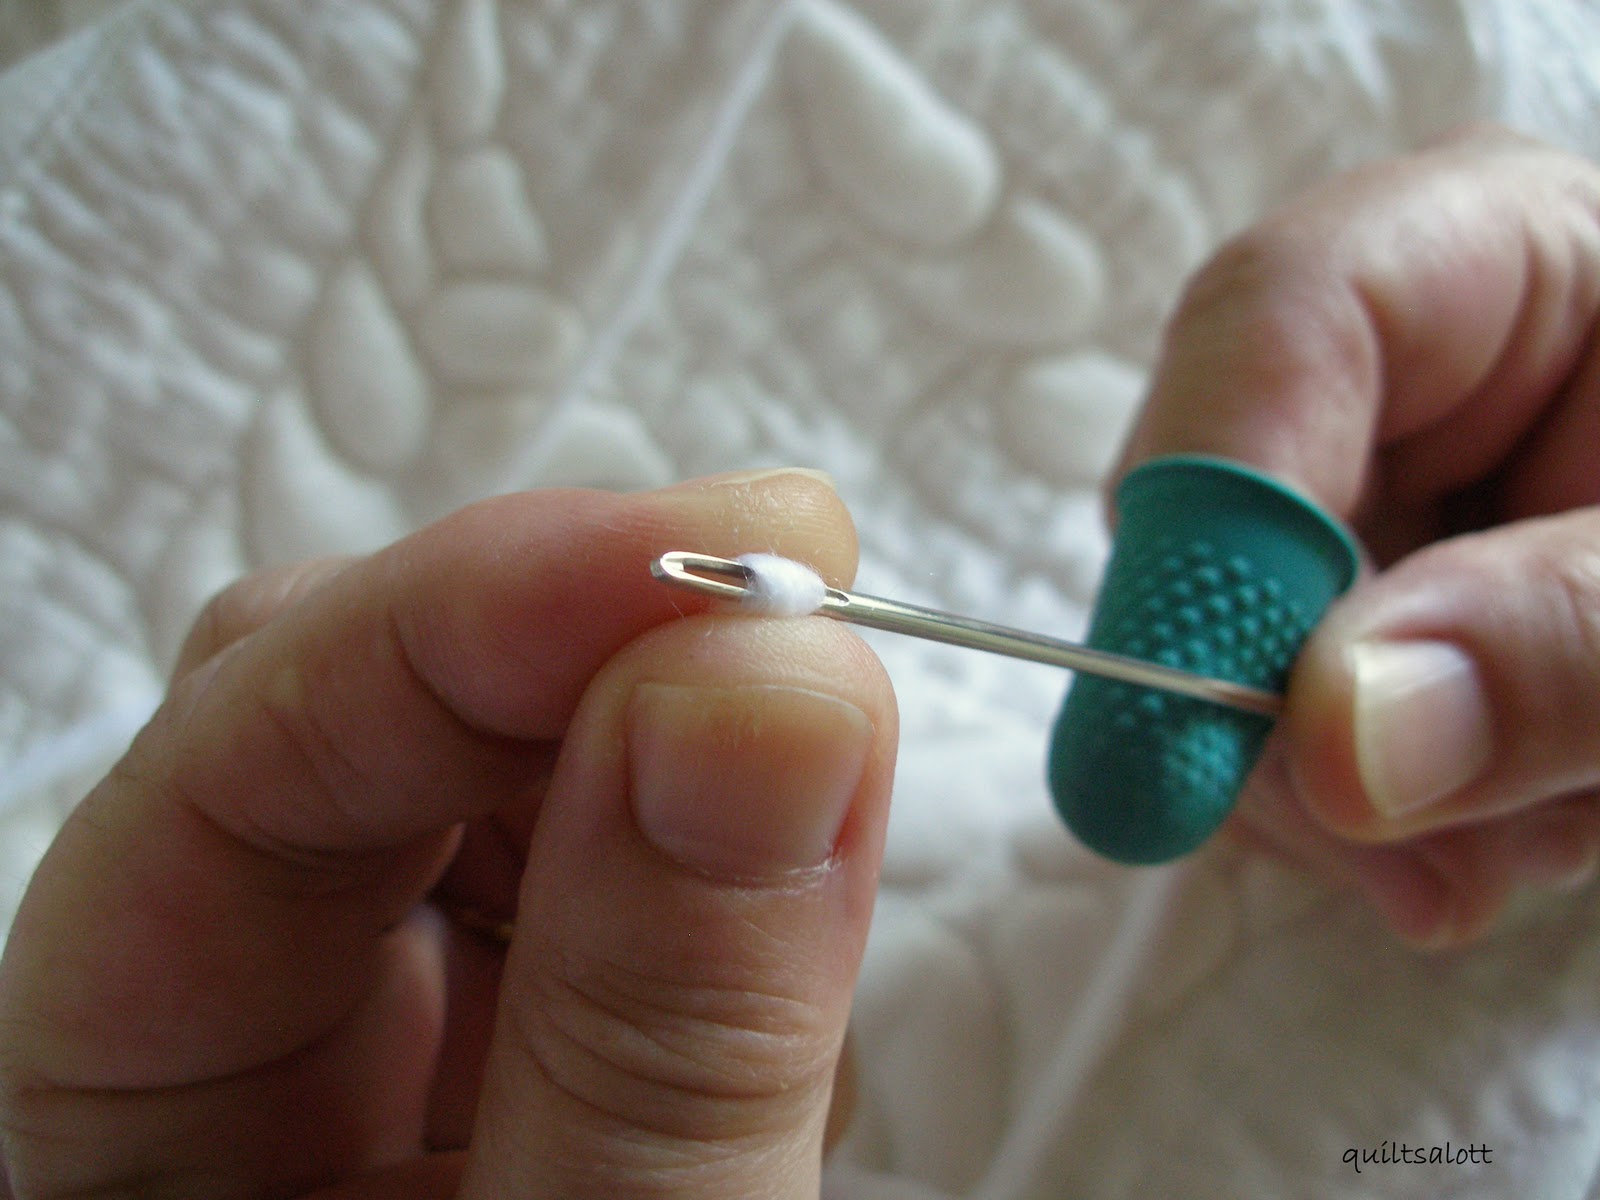
This yarn is very soft and doesn't feel like nylon at all. I like that the plies can be separated if needed.
Double over the yarn and thread the needle through the eye. I'm using doubled yarn so I make the tail ends even.
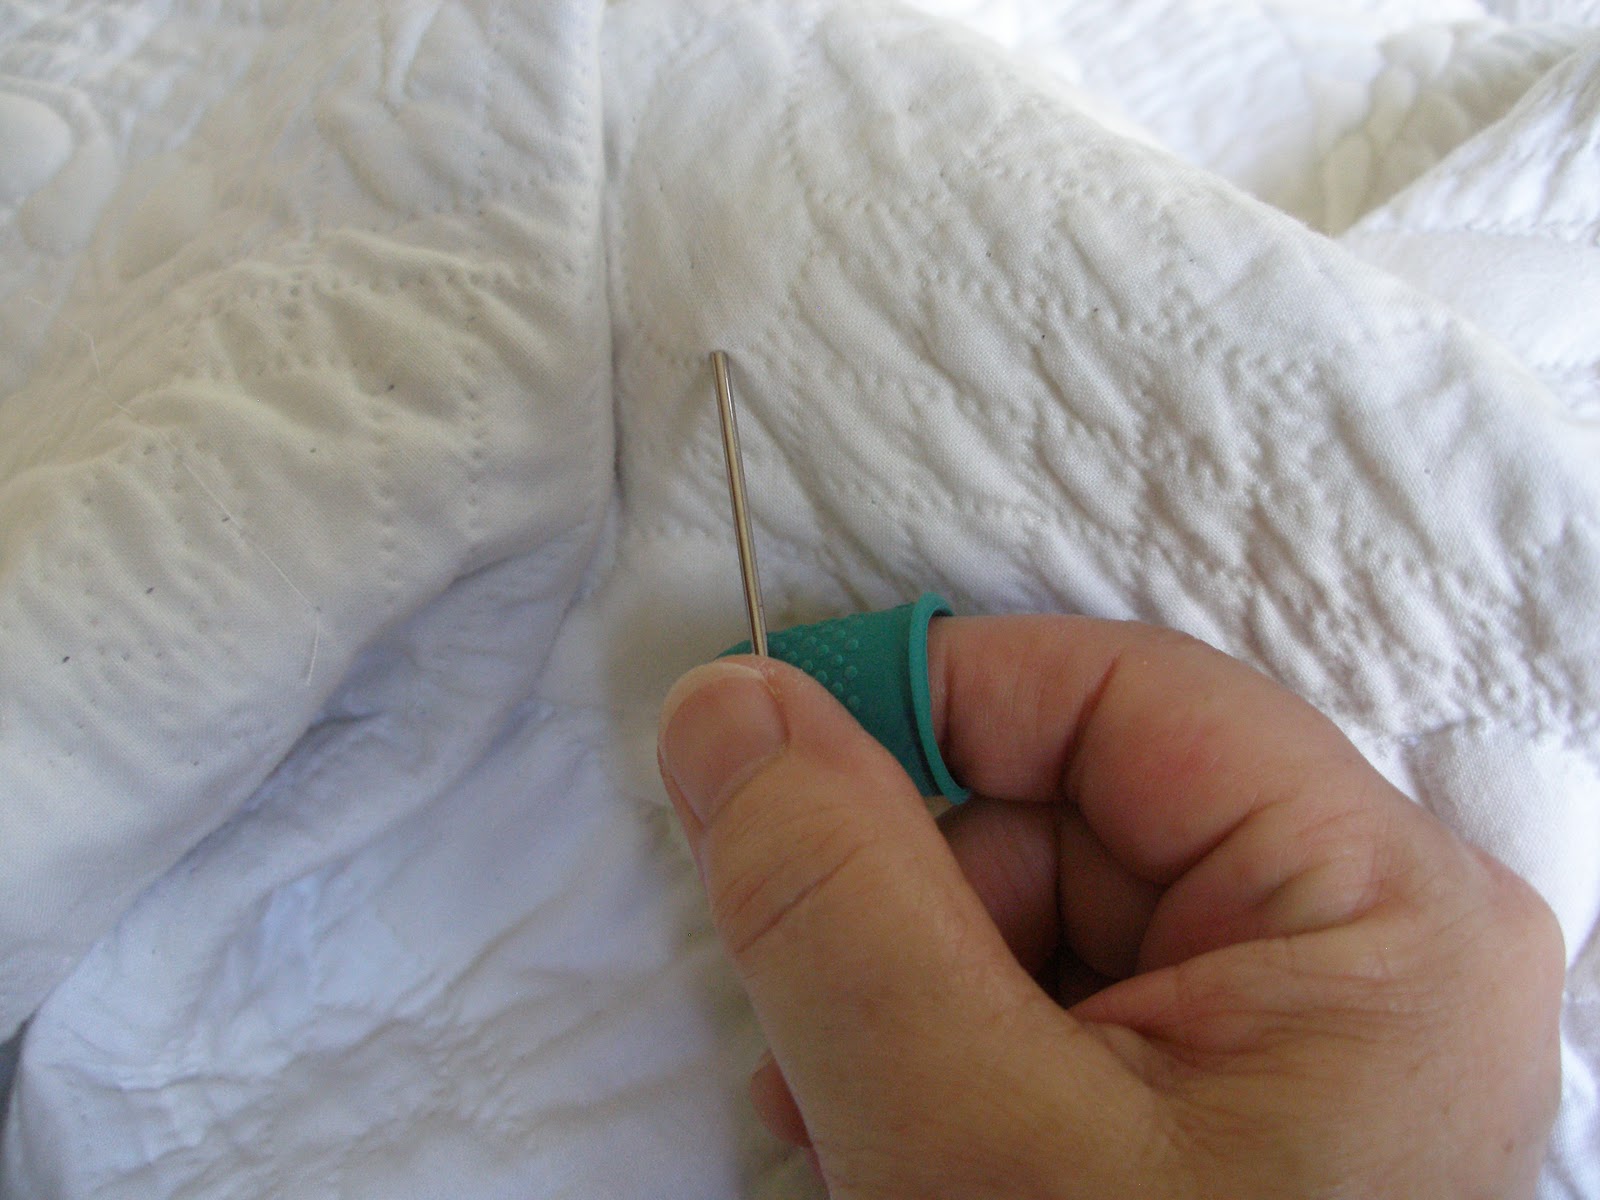
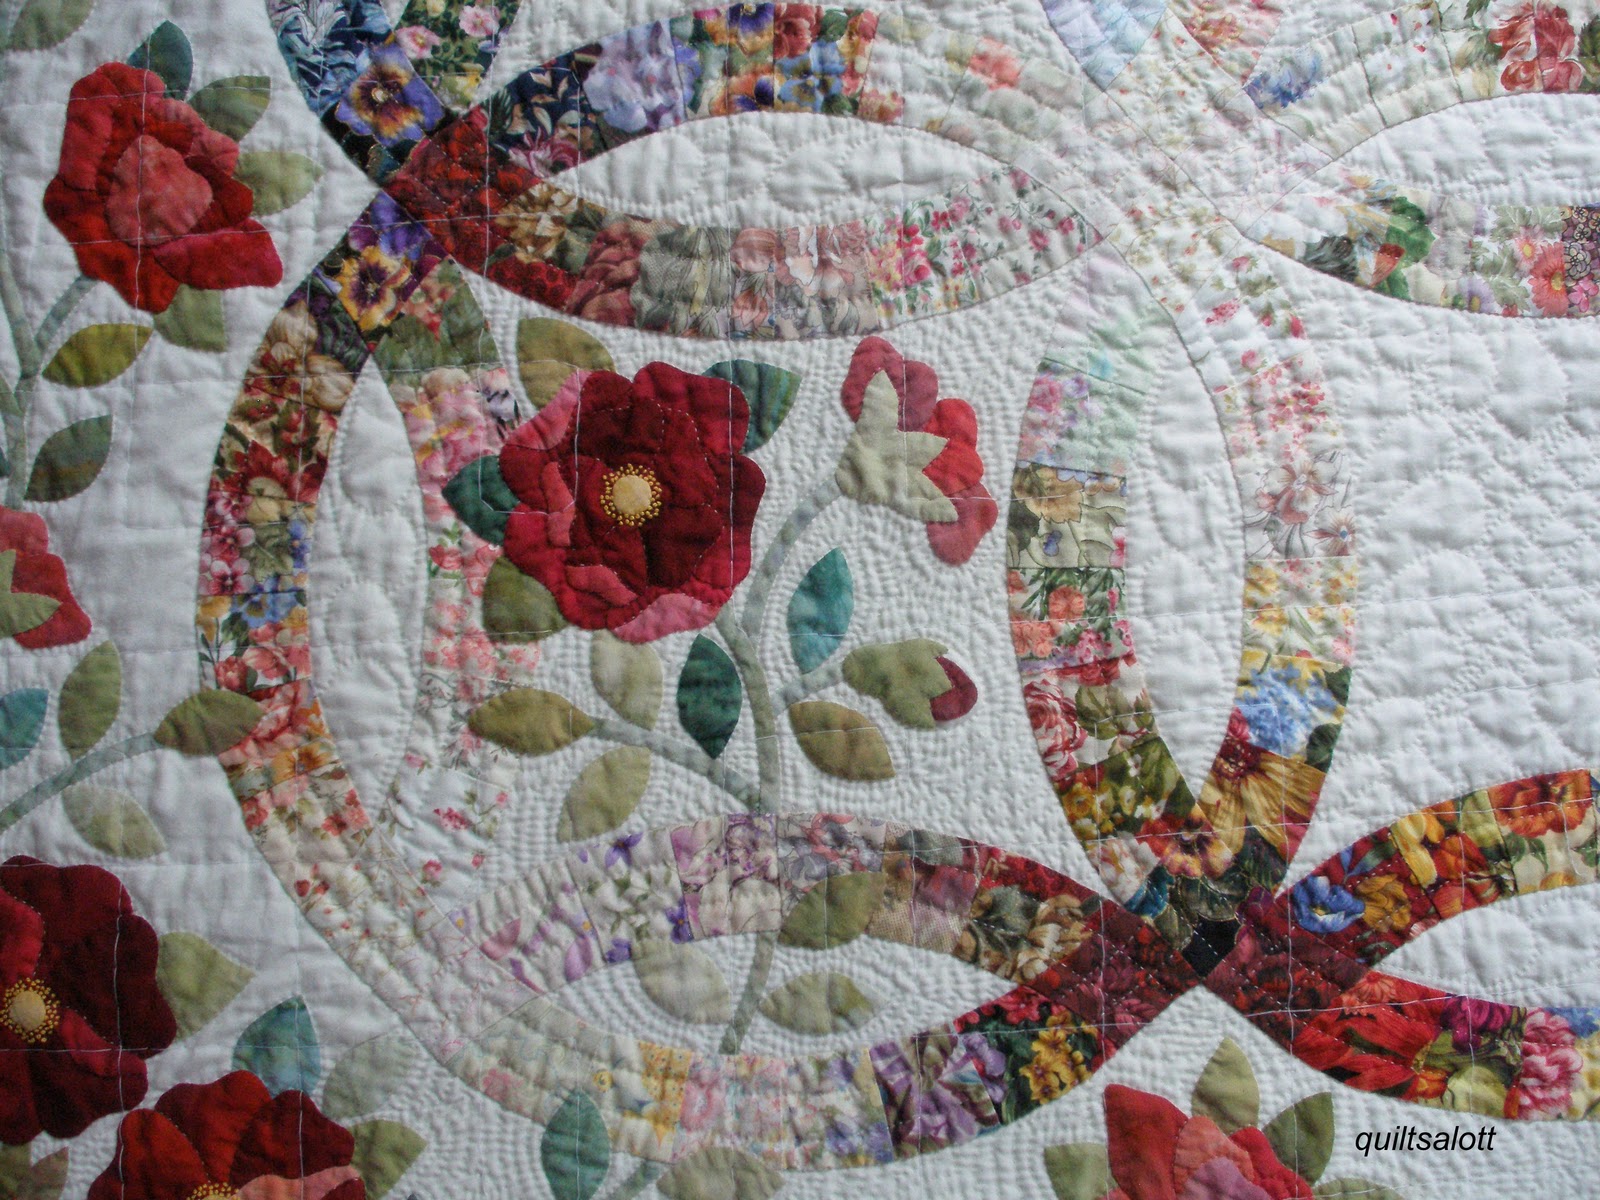
Because the tip of the needle is blunt, it won't damage the threads, it will separate them. A sharp pointed needle would damage the fabric threads and that's not what we want. I'm glad I used a plain muslin fabric on the back, it would be harder to see the quilted shapes otherwise.
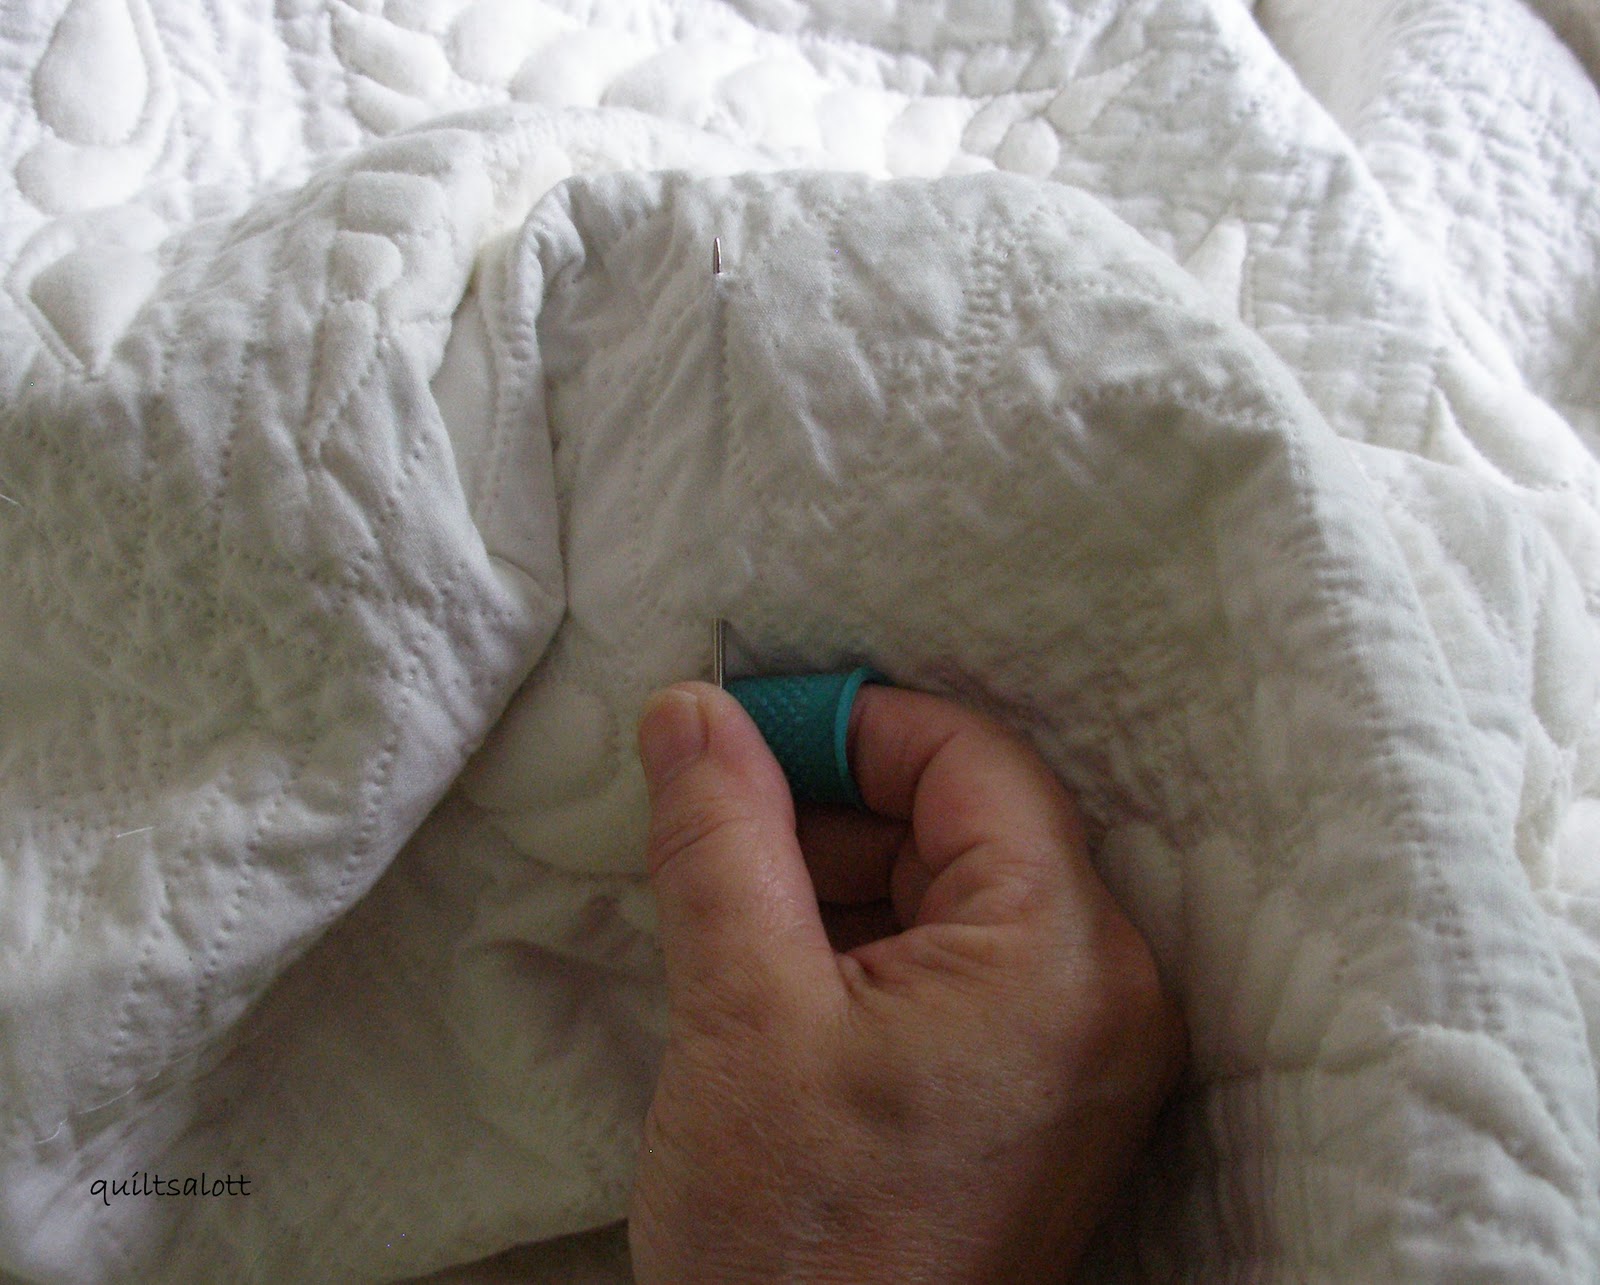
You can work the stuffing with or without a hoop. I like to do without since I can hide the thread ends easier later.
Wiggle the tip of the needle into the shape to be stuffed on the back side of the quilt. In this case, it's a feather shape. I'm holding the quilt sandwich in my left hand like a sock puppet. The needle goes between the fabric and batting, not underneth the batting or in it.
The needle exits at the bottom of the teardrop shape. It doesn't seem to matter if I start at the top or bottom of the shape.
Pull the needle and yarn through, you'll need to tug a little.
I leave about 1/8" tail at the entry hole, sometimes a bit less.
I like to put my finger behind the thread at the exit end so that I'll be more in control of cutting the yarn. About an 1/8" is good. I make this cut very deliberate and slow so as not to have an accidental cut into the quilt. I've found that I can cut quite close after a bit of practice. Caution is paramount though.
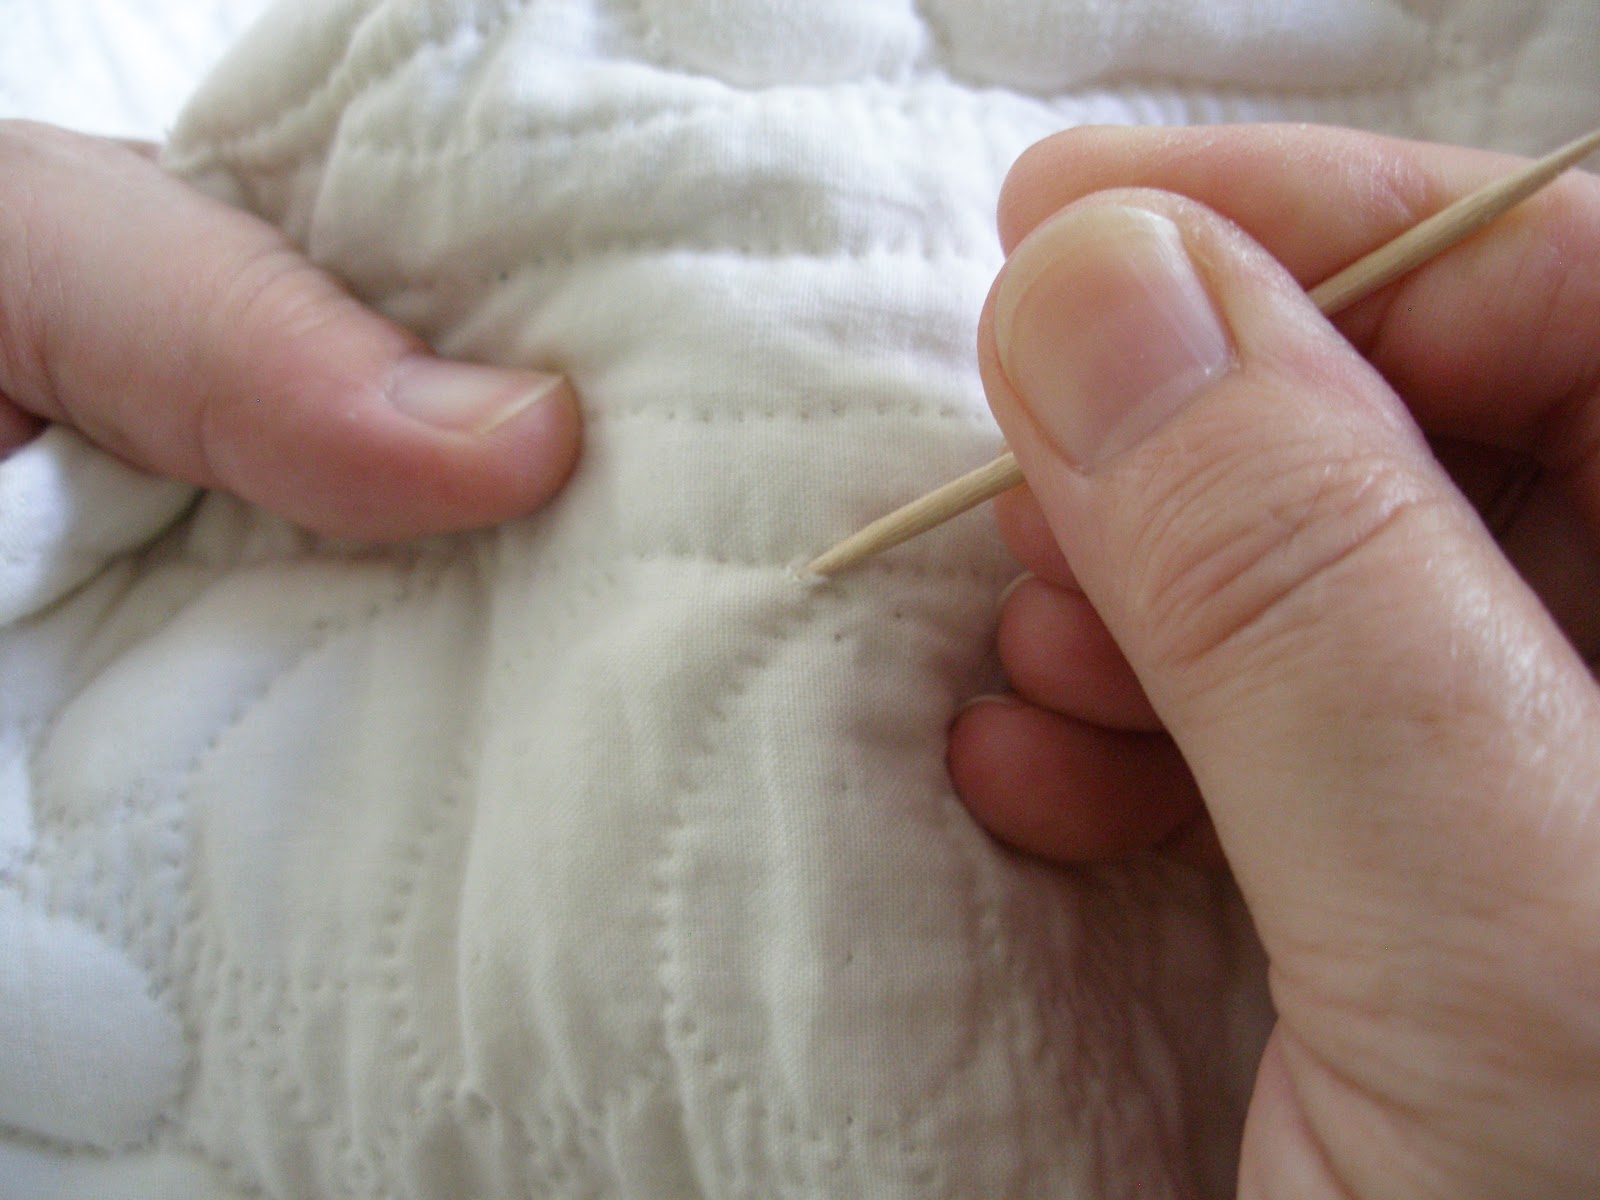
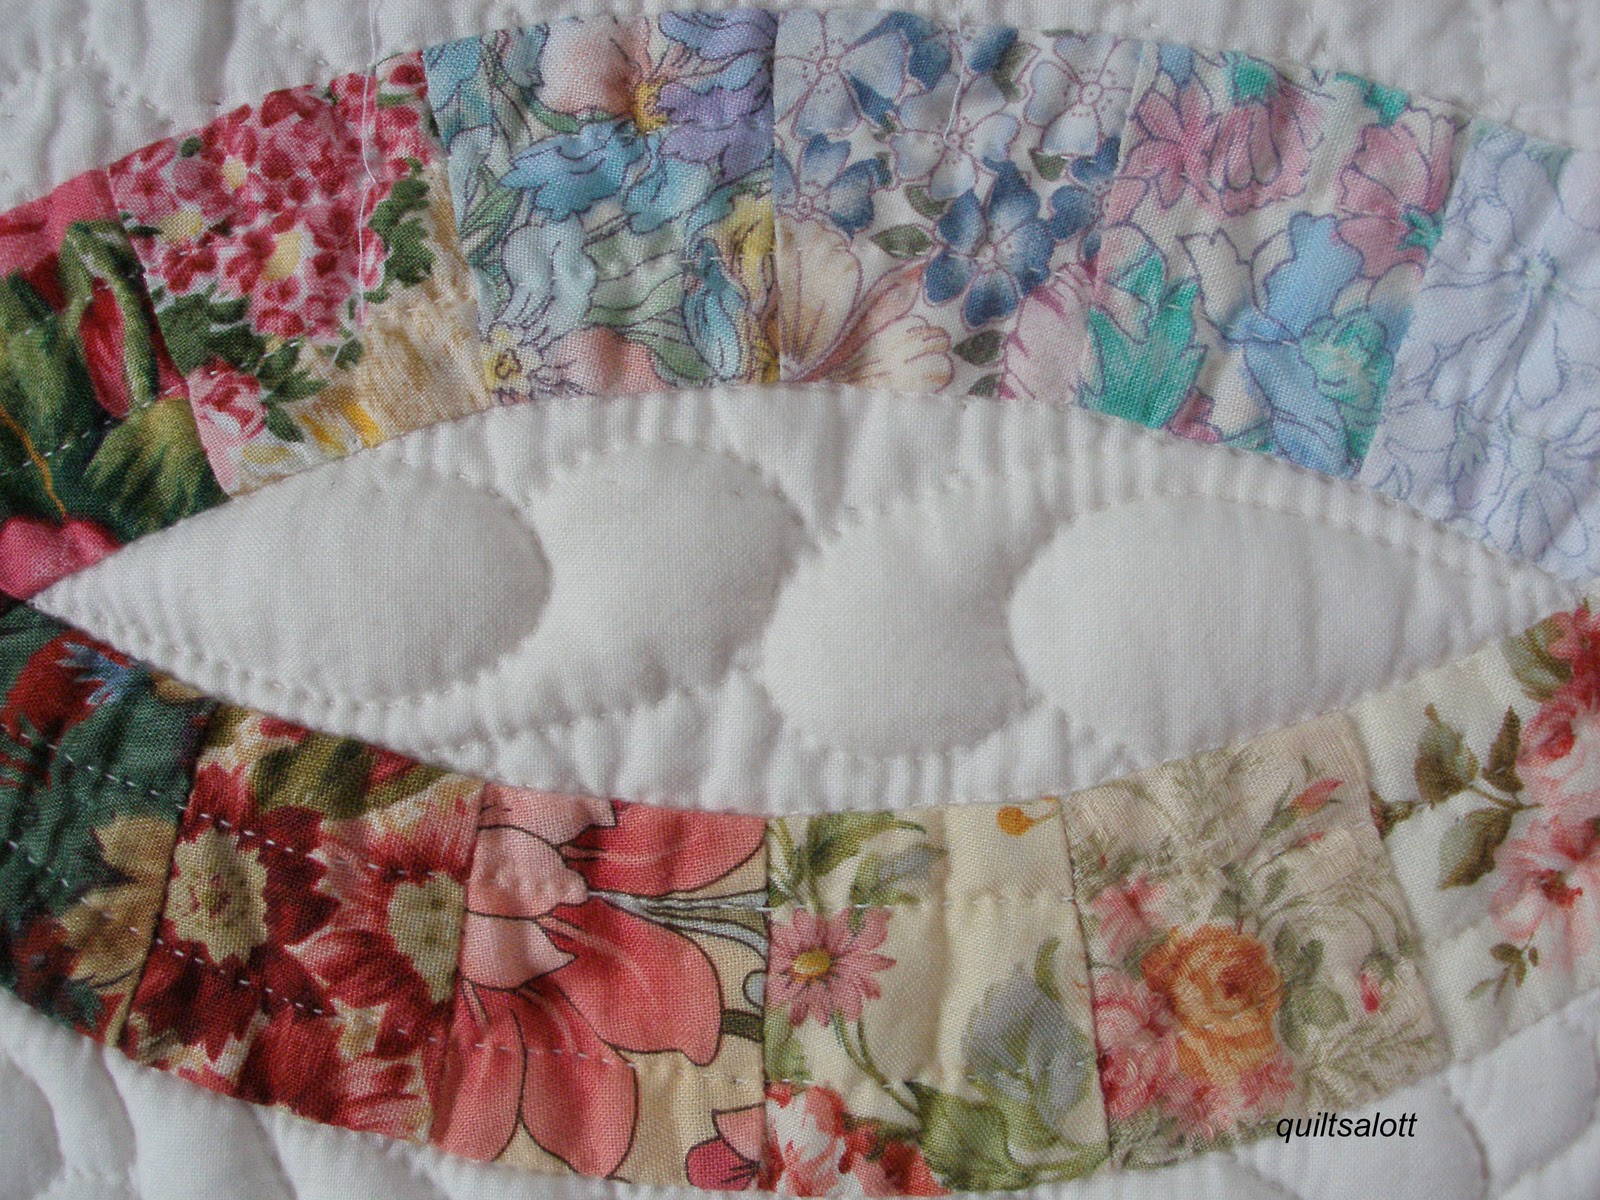
If I stretch the quilt sandwich like so, the thread ends often disappear inside the shape.
Another option is to take a sharp needle and insert and twist around the yarn inside to get it to go inside the shape.
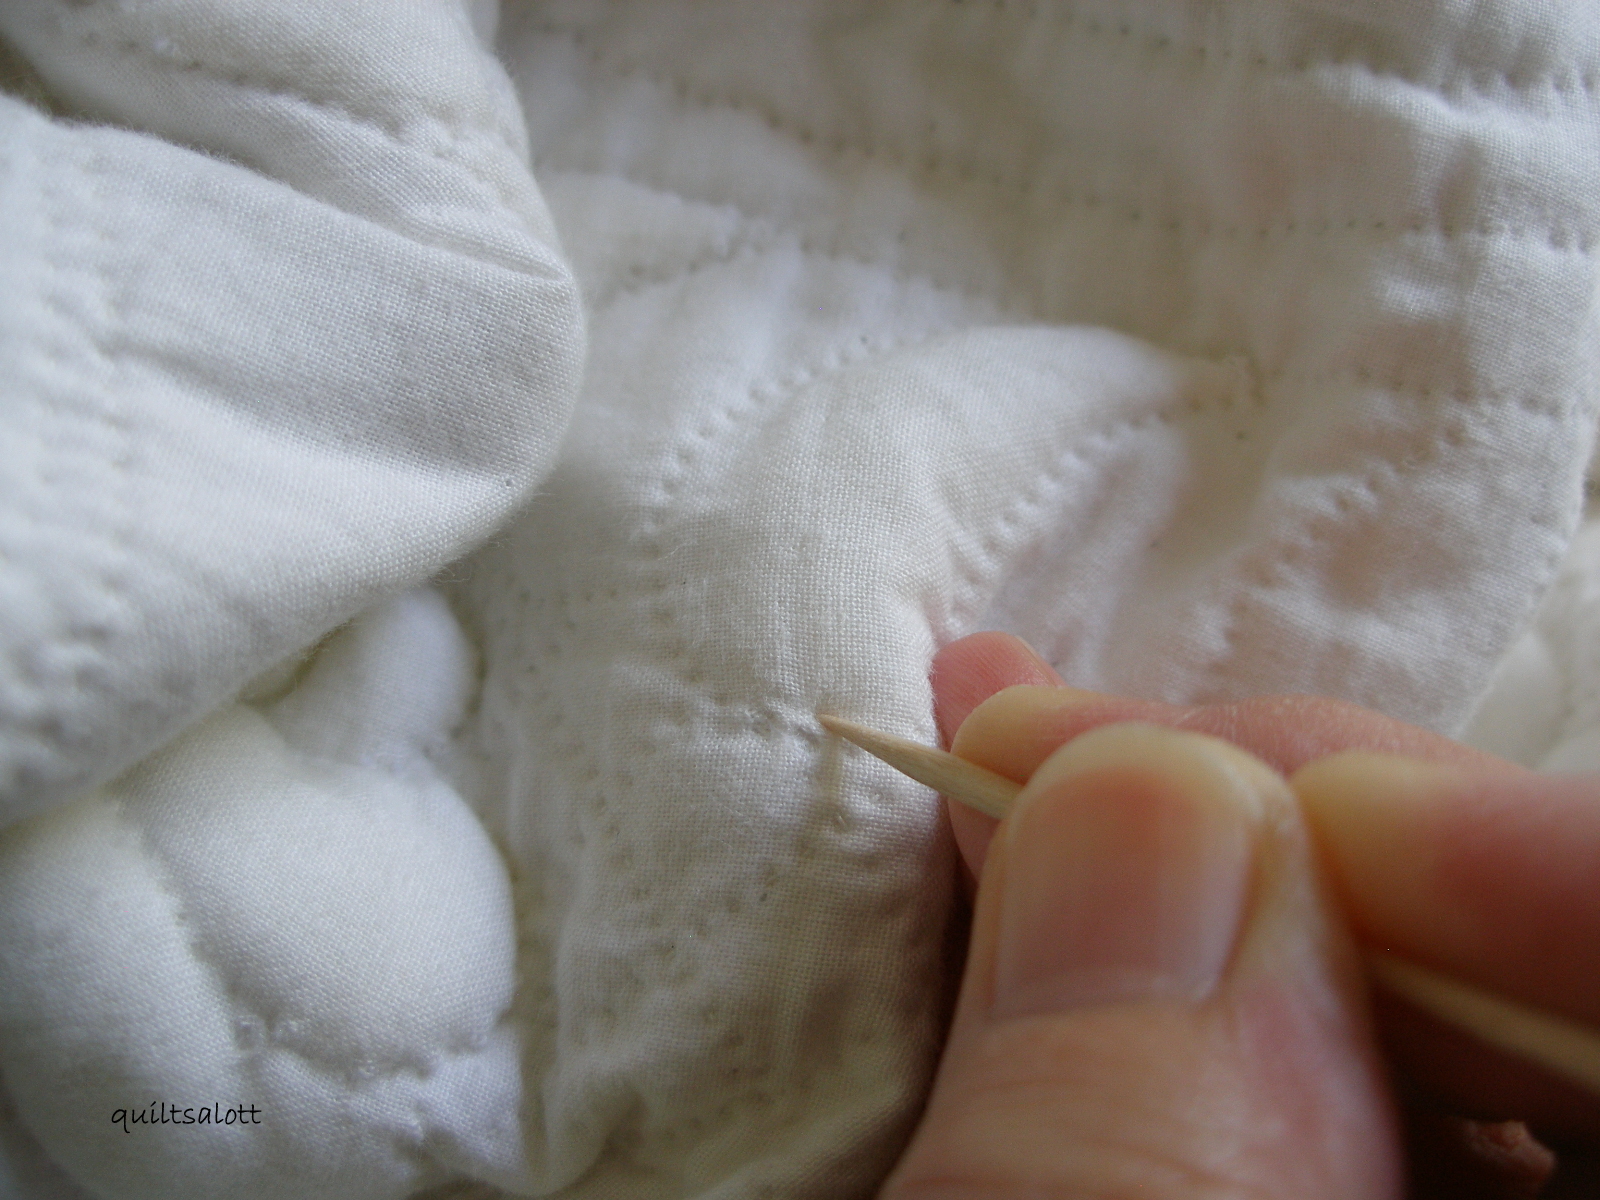
Or you can use the toothpick to poke the ends in the holes.
If you lightly scratch the warp and weft threads around the holes in the direction of the straight of grain, the holes will almost close up. I use the toothpick or a sharp needle. After washing, the threads around the entry and exit holes will close and tighten up further and there will be no evidence of how the stuffing got in there.
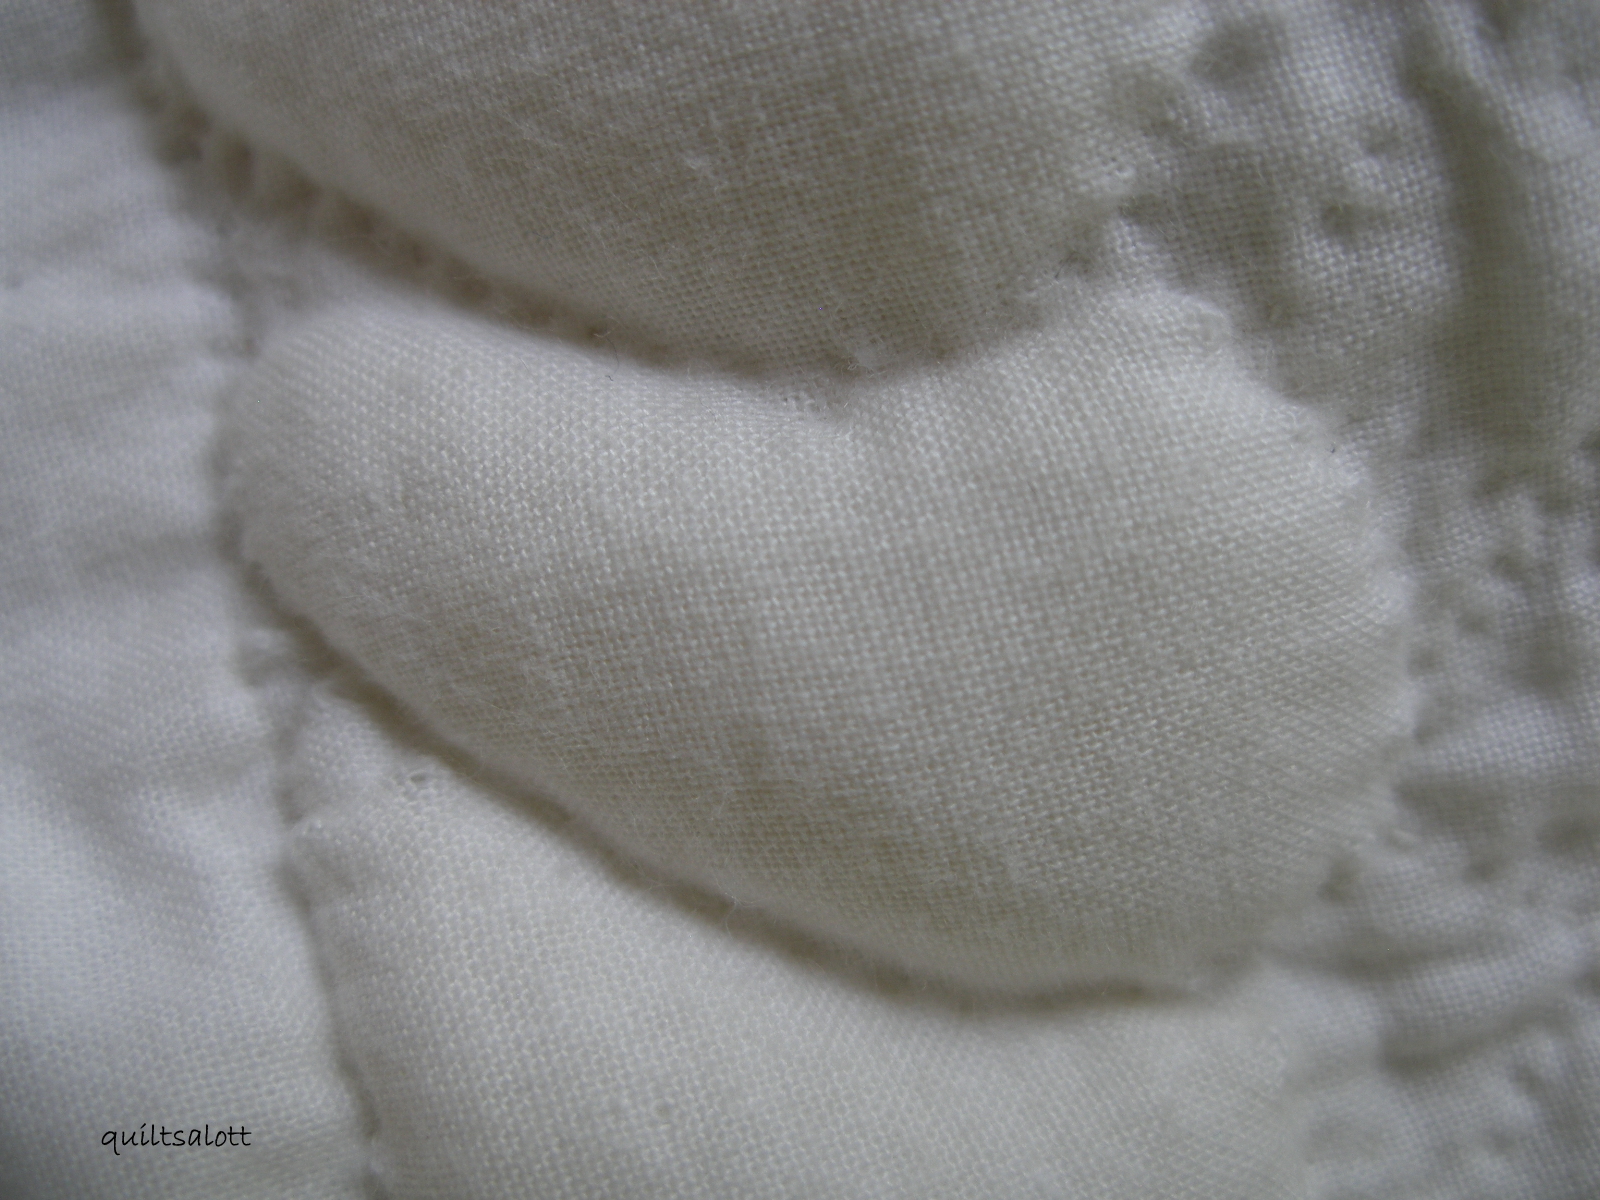
After doing what I described above, you can hardly see the gaps. Cotinue adding the yarn until the shape is stuffed sufficiently.
I'd hate to tell you in what order to stuff the shapes as I've found what suits me depending on the size. You could start in the middle and alternate side to side or you could start at one side and go from one side to the other.

You may need to stagger some yarn so that you stuff more plies at the fat end of the shapes. Do that by adding yarn from the fat end to about the middle or two thirds of the way down.
You know you've overstuffed if the quilting stitches on the right side look wrinkled. Stuff enough to give a full look but not too tightly that there's no give in the fabric. Check on the right side of the quilt.
Here's how it's looking so far. I still have more to do on the bottom left ring.
See, it's not hard but it does take time and it can be hard on the hand pulling the yarn through.
For cording or stuffing narrow lines, I would assess how many plies it would take and the process is exactly the same. If the channel is narrow, try a smaller tapestry needle.
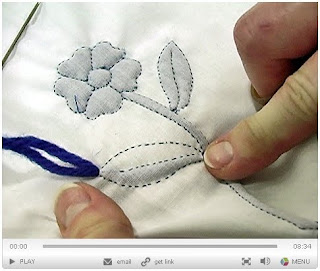
You can click on this link here to a very helpful video which shows the steps as I've tried to explain them.It shows French boutis but it's the same method only without the batting in the middle. 


Monday, March 21, 2011

I have a new love and it's name is...

But wait, I have to start at the beginning. It was National quilting day on the 19th and it should be called international quilting day by the way. Anyway, it's become a yearly ritual to pull this double wedding ring quilt out for some hand quilting. The weather is cooling enough to hand quilt. Even I roll my eyes at how long (years) I'm making this one last.
I read a great post over at Fabric Therapy that Teresa has written on her observations on how batting choice affects how quilting stitches look and I agree with everything she says and it made me think of this quilt.

My favourite batting for hand quilting to date has been the Quilters Dream 100% cotton, request weight.
It gives a great drape with the antique crinkled look I love. Maybe I should have gone for wool.
The one thing that's been nagging me is how the feathered quilting disappears with no definition. All that work and it doesn't show.
Last year at the Sydney quilt show, there was a special exhibition featuring selected quilts by Gai Haines. Gai does amazing hand quilting and trapunto to die for.
Look at these folded over trapuntoed feathers on her Baltimore quilt, sigh. I did talk to Gai about her methods and filed it away in my brain for one day.
Photos shown with permission.
One day has arrived and you guessed it, my new love is called trapunto. I just knew at the back of my mind that this is what I could do to accentuate my feathers. First a little try out in the melon shape.
Well I loved it so much that I just decided to dive in and go for it. What a transformation! Maybe I just love this quilt so much that I'm doing everything I can to make the quilting last.
Did you  manage to get some stitching done for quilting day? Next time I'll tell you how I tackled the trapunto.

Sunday, March 20, 2011

New information for sending quilts

If you are sending quilts to Japan, here's some updated information that Taniwa has posted on her blog on this post. It is from Dana Jones, editor, Quilters Newsletter magazine.


"I emailed with Naomi Ichikawa today. She has asked that if you are sending quilts directly to Japan, that you do not send them until May 1 at the earliest. Please watch this blog for regular updates on this time frame as things are changing daily in Japan.


If you are sending quilts to Quilters Newsletter [in Colorado] and do not want to write “Quilts for Japan” on the box, please enclose a note that says this. We receive many quilts in our offices and will only send quilts to Japan that we know are intended for Japan.

Please send only new quilts.

I am amazed but not surprised at the compassionate response to this call for quilts. In just 24 hours, we at QN have heard from quilters in the United States, Canada, South Africa, New Zealand, Northern Ireland, the United Kingdom, Australia, Germany, and Italy. We are truly an international community!

Thanks,

Dana Jones, QN managing editor

Send quilts of any size from baby to adult to:

Dana Jones
Quilters Newsletter
741 Corporate Circle, Suite A
Golden, CO 80401

• Mark your box: “Quilts for Japan.”
• Enclose your name, address, phone number, and email address with the quilts."

To keep updated, you can visit the Quilters Newsletter editors blog
http://www.quiltersnewsletter.com/blogs/insideqn/

or Taniwa's blog.
http://tttl1998.blogspot.com/

Saturday, March 19, 2011

Calling all quilters.

I feel a strong need to help someone in some way in Japan and bloggers are the best at lending a hand.
I heard a story today about a nine year old boy found by rescuers searching amongst the chaos looking for his mother and father. In his hand he had a drawing he'd made of them. I'm sorry if you're shedding the tears as I did but this makes it very real for me and I want to help in some small way to help bring a little comfort and I hope you might be able to help too.
I've decided to donate this quilt and send it to someone who needs it more than I do. Do you have a spare quilt or are you prepared to make one? They are asking for baby size up to single bed and lets not forget the boys and not send just girly quilts.
This is a copy of an email from the editor of Quilt Tsushin Magazine, Naomi Ichikawa, Naomi lives in Tokyo and her mother and brother survived the tsunami in Sendai.

Here is Naomi’s request translated into english.


It is still bad situation now in Japan. We are still nervous about shaking and radiation,but no way to escape. I start to announce to the quilters to send us comfort quilts for the people who are suffered.I would like to do it to the world quilters. We will deliver the comfort quilts to the people who are very difficult situation. Could you please help to announce it to the quilters? We accept any size of quilts(baby to adult).new or unused.

The deadline would be the end of May or later.

Send the quilts to: until the middle of April;

Naomi Ichikawa
Editor of Patchwork Quilt tsushin Patchwork Tsushin Co.,Ltd
5-28-3,Hongo,Bunkyo-ku,Tokyo,Japan zip:113-0033


after the middle of April

Naomi Ichikawa
Patchwork Tsushin Co.,Ltd
2-21-2,Yushima,Bunkyo-ku,Tokyo,Japan zip:113-0034

I will appreciate if you help me.
Naomi

Other bloggers are pitching in, check out Stephanies post where Nissan is matching Red Cross donations and she is raffling a quilt.
Christine is donating quilts and doing some quilting and would appreciate donations of batting. I guess she would probably love some fabric for backings too. She's also organising a binding bee at her place if you live near her.

Thank you dear friends and if you do send a quilt, write on the box, quilts for Japan. Include your name, address and email address. I believe Quilters Newsletter magazine will collect quilts for sending.

Thursday, March 17, 2011

My first doll quilt swap

Christine has been hosting a doll quilt swap with two rounds. I jumped right in and thought about it later and boy oh boy, who knew that I'd like doing it so much. Now I get to show off what I got in the mail from my swap partner Barb.
The quilt was inside this project envelope, I thought that was cool, I love the retro cherry fabric and the ric rac.
Am I lucky or what!? I adore what she made especially for me. The applique is beautifully executed and so is the hand quilting. I love the fabrics and colours and this one is perfect to go with my few dolly quilts on the wall.
 Barb is an expert at doll quilts, she's made many of them and always puts a fun fabric on the back.
If you haven't seen what I sent in exchange on Barb's blog, here it is and you can see much better photos on her blog here. I really am quite envious of the antique doll bed she has. This basket quilt has two inch blocks in case you were wondering.
Here's a real doll in a bigger quilt. That's my nearly two year old step granddaughter Beth playing at my house. I can never catch her not pulling a funny face when I bring the camera out. She really is so sweet and a bit shy.

Wednesday, March 16, 2011

Bits on the side

If you read my blog you probably remember that little adventure with cathedral windows back here. I couldn't really leave it languishing without turning it into something useful and now it's a 16" cushion.  when I saw the cushions on Little Miss Shabby, I fell for them, I'd like all of them actually. Oh boy, that makes me such a copy cat.
You never know what I get up to over here, I'm not biased. Sometimes I do stuff  bit more modern and sometimes it's a bit more traditional. Actually it's all traditional, what changes is the fabrics and colours. I know I hang around blog land and get enthused and inspired by what others are doing. I've had my beady little eyes on Sue Garman's Baltimore pattern for awhile and I just had to have it, you understand right?
The patterns are available at Quakertown Quilts.

I made a promise to myself not to make a start until I have all my blocks done for my other Baltimore. That doesn't stop me thinking about fabrics. I picked up a few fruit fabrics from J and O Fabrics by looking under the fruit and vegetable section. They had an awesome strawberry and a perfect pineapple print.
The strawberry fabric is a lovely orange red rather than a tomato red. I may use the watermelon skin if I dye it to tone the brightness down. The aubergines are great for grapes.
Perhaps I could prep some freezer paper templates, that's not officially starting.
I did run out of prepped applique blocks for the flower garden quilt so picked these baskets up and got four done in front of the television. They are my bit on the side and now all my other oldies but goodies are calling to me. They'll just have to wait their turn.

Thursday, March 10, 2011

More blooms

More blocks for the Flower Garden quilt and that means I have a total of thirteen done out of twenty four.

Tuesday, March 8, 2011

Seuss loot

I see fabric lines coming out and I usually pass it by and then months later I decide I really need it. That's when it starts getting thin on the ground and I have to search for what I want. Oh the thrill of the chase.
I have in my hot little hands a fat quarter bundle of the Dr Seuss Cat In The Hat fabric plus some other pieces of Seuss yardage.
It's not easy coming up with stuff to make for boys so this is just the ticket. I found some very good ideas like This pillow from Nova
I made this quilt about eight years ago when my son was a teenager, he wanted bright and that's what he got although it looks pretty faded to me now.
I was hand quilting it and snipping off the plastic tags that I'd used to baste it, when I cut through the top. Luckily it was in a bottom corner. The first thing quilters think of is what can be appliqued over that cut. I had a piece of the Cat In The Hat fabric and it added that little surprise in the quilt that looked like it belonged.
Now if I had more of this fabric, I could even whip up some pillowcases, somehow I don't think I have enough for it all.

Wednesday, March 2, 2011

Swap reveal

Look at what I got in the mail, a Nosegay wallhanging. I love this block but have never made one. Jessica over at Scrappy n' Happy offered to make me one in return for something to hang out at her place.
I happily obliged and I love what she made me. I have a crush on red and aqua and I have a crush on these fabrics too, thank you Jessica, it's beautifully made.
And a cute little ring pincushion was a bonus gift in the package, love it.
Here's what I sent, some more Kaffe love and a block from Kim's pattern The Garden Quilt.
I free motion quilted this one and had a lot of fun. I did all sorts of quilting designs on it. I'm calling this my smorgasboard quilting.
I knew Jessica had a spot all picked out to hang it so I took the liberty of adding some hanging gizmos on the back using these picture hanging strips and some twill tape.
This method is fabulous because it means you don't have to have any holes in the wall and it can easily be removed. Now I need to find some time to do all my doll quilts the same way.
The information for doing the strips is over on Quilt Otaku with a video link and in the video, you can see how to remove the quilt off the wall without straining any stitches on the quilt.
I just have one more swap to get my skates on and finish, no sneak peeks or you'll be able to guess what it is.
Over at Manaiba's blog, Sewjournal, there is a special quilt auction happening for a 1930's reproduction quilt, It's for a very worth cause, go have a look over here.